No jumping and dunking into the trap? What a shame.
5 Likes
The WSRP patented Trap Flap Super Slap™️ will have to wait for another season.
16 Likes
I am interested in what the discussion was for saying no to a buddy climb because even though it seems difficult, what aspects of it do you guys think make a buddy climb truly unreasonable?
I think a lot of the context is in what events we will be attending this year, and how competitive they have been in the past for comparable tasks. At both CIR and Midwest in 2022, we were able to get the Hangar RP at a fairly decent rate, based on how many teams at these events had at least a mid climb that year (maybe a harder task than just lifting onto the chain this year?).
I just went back and double checked the numbers from both of them and seems to be in line with our gut. Both events had ~55% success for mid climb or above (and another 5% low bar).
Odds seem good that we will have at least 1 partner that can climb in most quals matches, which is enough to secure the RP with a trap score from us. Good enough odds that the investment in a robot wrangler doesn’t seem super worth it.
CIR 2022 RP rate:

Midwest 2022 RP rate:

17 Likes
Robot Actions:
After kickoff and extensively reading the rulebook, the members of 112 immediately started brainstorming. Like we always say, there are no bad ideas, just illegal ones. The first thing we did was determine our robot actions and priorities. This is always our first step in brainstorming, you can’t build a robot if you don’t know what you want it to do. Our goal was to be as specific as possible when listing actions. Things like “Drive under the cain” and “strafe under the chain” had to be listed separately, because a robot that can go forward and backwards under a chain is going to have a different architecture than one that can go under in any direction.

Goals and Priorities for the Team:
Before determining our priorities with our robot actions, we had to determine a goal. A robot aiming to be an alliance captain is VERY different from a robot aiming to be a first pick. Our goals that we were deciding from were being an alliance captain, being a first pick, being the first pick of the first alliance, and qualifying for World Champs. This became a long conversation and debate about what is realistic for our team, considering our resources. Rather than build a jack-of-all-trades robot, we decided that it would be best for the team to aim to be a first pick, and design our robot to specialize in one aspect of the game to appeal to the alliance captains, with the stretch goal of making it to World Champs. We then decided that we would specialize in shooting at the Speaker, since it is relatively easy compared to the other tasks, and alliance captains would likely have systems to score the amp and traps already. This also (ideally) allows us to finish early and maximize time for practice and software development.
Season Goal
Goal: First Pick by an Alliance captain
What does an Alliance captain want from a first pick?
Climb, with ability to harmonize
Complimenting Autos
Zoooomies and Maneuverability
Low CG
Fit under stage
Spam the Speaker
Needs, Wants, Nice-to-Haves:
After determining our goals and priorities and every possible robot action, we went straight into sorting the robot actions into our Needs, Wants, and Nice-To-Haves (and also “No’s”). We do this to determine what we need for a base robot design, what we should aim to include, things that could be included if we find a way to do it with relatively low effort, and things that we want off the table. This list may change as we go through the season, as we learn more about the game.
Needs, Wants, Nice-to-haves
Needs:
Move (forwards, backwards, turn)
Move (strafe)
Move (fast)
Fit under stage
Score in speaker from: podium, subwoofer, area of our zone between the amp and the stage.
Pickup from floor, opposite shooter
AprilTag localization and targeting
Signal to humans
Eject Note
Wants:
Climb high end of chain
Harmonize
Grip chain
Score in Amp
Score in Speaker from: Neutral zone, own Wing south of the Stage
Change shooting angle
Pickup from Source
Dual intake
AprilTag Climb Alignment
Nice-to-haves:
Un-climb
Mechanical alignment
Level robot on chain
Change shooting direction
Score while moving
Score on the Trap
Plow into notes
Right self if tipped
Catch, rebound Notes
Shoot into the Neutral Zone
No’s ![]()
Jumping
Buddy Climb
Buddy Score
Climb on Subwoofer
Pickup and score High Note
Strafing along chain
Reorient Notes for pickup
Tipping over
Next step: Prototyping!
20 Likes
111 Robot Design Paths
Been a busy couple of days here. We have assembled our new Vortex MaxSwerve sets into a test mule robot for software dev and testing some of the more ambitious prototypes. The electrical wiring was completed on that tonight and the chassis was handed off to software for Vortex bring up and autonomous pathing work.
The main focus of the mechanical and strategy teams has been establishing robot performance targets (more from @DohertyBilly later) and a overall robot architecture for the design teams to execute on. We often begin this discussion by describing and analyzing the motions that different robot actions would require, describing them, and trying to group subsystems by movements in order to drive us towards robot architectures and packaging.
With that, here are our functional descriptions of the various subsystems that we expect to have on the 2024 WildStang robot.
Drive Base
- Very, very fast and maneuverable. We expect lots of criss-crossing driving due to the cycling game design, and need a robot that will do whatever the driver commands on demand.
- Very very robust. That same cross-field cycling coupled with the most powerful motors ever in FRC this year is going to lead some highly energetic collisions. We are talking on the order of 34 mph (2x bots at 25 fps) robot collisions this year. This means very strong frame rails.
- Lets be real, were we NOT going to do swerve?
Intake/Game Piece Acquisition
- Fast enough pickup time to allow full speed note acquisition from floor. This is key to stealing and shortening cycle times.
- Mounted to opposite side of launcher exit to streamline autonomous pathing.
- Mounted and functions entirely inside bumper perimeter. There are going to be some crazy collisions, and anything outside the bumpers is subject to taking some serious damage. Deployable intakes also tend to be very large and CoG intense when retracted. This is not ideal.
Launcher
- Enough range to hit a shot from the mid-field side of the stage. This shortens cycling time between the source and speaker by cutting ~25% of the driving.
- Variable Launch angles to accommodate subwoofer shot up to potentially midfield launch positions. Attached feed system to minimize deformations of the notes before launching.
Amp Mechanism
- Ideally always in a ready to go state, requiring little to no anticipation from the drive team to be ready to score into the amp when needed.
- Needs to vertically deploy to meet reach and stowage design targets.
Trap Mechanism
- Uses the same mechanism as the amp to reduce robot complexity. These are highly similar scoring actions, so using the same mechanism feels the most streamlined.
- Needs to be vertically deployed to meet both reach requirements and maximum stowage height design targets.
With all of that in mind, here are the 4 design paths we are actively investigting for 2024:
Robot Type 1
Double Jointed Arm on Lift w/ ‘Shower Rod’ Climb
Robot has a high pivot arm that near the launcher exit. The arm is capable of reaching the ground for floor pickup on the opposite side of the launcher. When raised, the arm can reach the height of the amp for a quick amp score with a reversing of the feed and under the bumper intake into the amp.
The feed system is mounted on an arm of its own. When the arm is rotated such that is reaches maximum 48" extension, the arm can unfold out of the main arm to reach the amp scoring height. The entire arm is also mounted to a lift. After climber deployment and engagement with the chain, the lift is used to raise the drivebase from the floor and given us additional expansion room upwards to deploy the feed arm.


Robot Type 2
Note Launcher on Lift w/ Amp and Trap Diverter
Low mounted launcher on shoulder for launch angle adjustment. UTB intake feeds up into backside of launcher. The launcher is capable of over traveling to do a handoff into a 4481 inspired amp redirector. Uses strong arm to pull down on chain. A wheel mounted below the amp/trap mechanism rides up the wall as the strongarm pulls. The lift is angled such that the wheel moves to the outside of the bumper perimeter when deployed to climbing height.
There is much internal discussion if the launcher is mounted to the lift carriage or is bolted directly to the drive base. On one hand, directly attached the carriage and shooter/feed arm makes the handoff between the two sub-systems much more repeatable. On the other, this means that the entire launcher would have to be lifted each time we moved up to the amp or trap scoring positions. Being able to raise the launcher would also give us the opportunity to fire notes over some defenders by raising the entire shooter.
*This one is currently our favorite of the bunch.

Robot Type 3
Single Jointed Shoulder (Credit to 1339)
Feed/Launcher system mounted to single jointed arm. This is the least degrees of freedom we’ve seen. Does require a pretty large chunk of robot to be suspended from the shoulder. This may lead to control issues. when scoring amp. Potentially very difficult to deploy arm to climb position when between the stage core and chain in its rest position. Climb would require a lift or strong arm to pull robot off ground.

Robot Type 4
Split Path Robot
Note path has a Y junction that diverts it to either the launcher or to a dedicated amp mech. This amp mech is mounted to a linkage/arm that vertically deploys it to be used as a climb reaction arm.

30 Likes
112 Design Update & Decision Matrix
After a week of brainstorming, cadding, and sharing our ideas, we whittled our robot design down to 3 archetypes:
-
A low-pivot shooter with a lift to successfully reach the amp, and double as our climb mechanism
-
A high-pivot shooter with the geometry to score speaker notes, drop notes into the amp at a high angle, and climb onstage all with 1 rotating arm
-
A low-pivot shooter with a folding drainpipe amp scorer, as we saw prototyped in 4481’s and 3847’s build blogs, which we thought was awesome


In order to make our decision between these three designs, we turned to a decision matrix, which allowed us to score these designs in 10 weighted categories we thought were important to consider moving forward. The most heavily weighted categories ended up being the simplicity of both the mechanics and controls, so as to avoid giving our mechanical and software sub teams too many headaches, and to optimize repairs in the pit at competitions. We also heavily prioritized a low center of gravity. As much as we like to say “If the bot ain’t tippin’, you ain’t whippin’,” we decided keeping our wheels on the carpet for the whole match was probably a better strategy. Lower priorities were mostly game actions that while possible with our designs, weren’t cohesive with the strategy we had decided to undertake earlier in the week.

After some Google Sheets magic, our results seemed VERY conclusive. A low-pivoting shooter with a drainpipe amp scorer checked all the boxes of what we were looking for. We’ll begin designing and building soon in hopes of having a drivable robot within the next few weeks!
25 Likes
Robot Performance Goals
Well, looks like we’re about to enter The Deep Freeze over here. Shop closed for the weekend due to snow and cold – which is sad, but it presents a great opportunity to work on a blog post!
As Harrison mentioned, we’ve been a bit more detailed with our robot performance goals this year. We introduced a new cycle time chart tool this year to help us break down the game, both from an alliance perspective and an individual robot perspective. That info has been key in driving our discussions on design priorities and speed requirements.
What is a cycle time chart?
I’m glad you asked! A cycle time chart is a way to visualize how long a series of actions take when you add up the time every step takes, from start to finish. The goal is to understand what parts of your process take the most time, what steps can be done earlier/in parallel to reduce overall time, and ensure that the complete set of actions meets whatever time requirement you have.
We’ve used this for 2 main purposes so far: to see if 2 speaker shots were possible in the same Amplification period, and to get an early understanding of how match play might work out at some of our early events. I’ll focus on the speaker cycle today – be on the lookout for a follow up post on match play over the weekend!
2 Speaker Shots in Auto
In order to maximize the number of points you can get when you activate the Amp, you need to be able to score 4 Notes in the 10 second window + 3 second grace period. With 3 robots on an alliance, that means one of them needs to account for 2 of those 4 notes.
Stashing notes in the wing is a way to make this significantly easier, though that is a bit telegraphed and also takes time to set up - making it less reliable. Our goal in this chart was to figure out if we could make it happen driving all the way to the source and back, or if 10 seconds was just too short.

Our cycle starts when the robot begins the action of the first shot, and ends when we get second note into the opening of the goal. As it turns out, it IS possible to get the double cycle in - assuming all of our actions happen in the time we said they were going to happen in! It’s very tight, with a margin for error of 1.75 seconds based on our math here. The critical path requirements here are:
- Must be able to drive to the source from our shooting location within 4 seconds (the path in reverse is assumed to take the same time).
- Must be able to intake the note and begin our return path within 0.75 seconds (the chart shows 0.25 seconds for note intake time and 0.5 seconds for driver response).
- Must be able to orient to the Speaker within 1 second after we get to our shooting position.
And that’s all there is to a cycle time chart! It’s important to understand that the assumptions are a best guess, and things can come up that might mean we’re slower than expected. That could be the robot being a bit on the heavy side and slowing down the drive (a design risk) or defense causing us to take an extra second to and from the source, resulting in missing the second Note (a match risk). Hard to know right now what we’ll see at CIR, but setting the goalpost is an important first step. We used some rough estimates along with @Eliot doing some calculations on the drive speed to come up with this chart, but I’ve heard reca.lc is a great resource for getting more accurate mechanism times if you want.
Importantly - it also looks like we will need to activate the amp with the Note already in the air in order to squeeze out every last second from our window. Our human player on the amp will need to get some practice in for that timing - might need to bring a Family Feud buzzer or something…
If you’ve read all that and want to try some charts yourself – you can! I made this as a Google Sheets doc so you can copy and play around with it to your heart’s content – the link to the source doc is here:
Look out for part 2 on match play and auto strategies this weekend!
19 Likes
Snow days into holiday weekend be like:
2 Amp or not 2 Amp? That is the question.
Part 2 of our cycle time studies was driven by the question of what to do in auto: you’re ALLOWED to score in the amp to build up the charge early, but will it ever be worth giving up the extra 3 points per Note? Our answer right now: It’s complicated.
Firstly, some assumptions here. Obviously, nobody (other than 1678 I guess) has had a bot on the field running true cycles yet, so it’s pretty difficult to make accurate projections this early in the game. To try and shorten the overall post I’ll put our reasoning for each timing assumption in drop downs, and the final values (for our first go at this exercise, at least) at the end of the section.
111 Timing Assumption
The first cycle time post covered our speaker time target – for the sake of these charts, we assumed that 111 would meet those goals and have about a 12 second cycle time to get a speaker shot off. The amp is going to take a little longer to drive to and probably be a little slower to align to due to the precision required. To have a healthy factor of safety, we assumed an amp cycle would take 18 seconds at our week 3 event (~6 cycles in tele-op per match if only doing amp, which is close to our performance at week 2 Midwest last year. Hoping we exceed this, but feels reasonable for now).
Captain/Partner 1 Timing Assumption
So, let’s say 111 has a 12 second speaker and an 18 second amp cycle. On a playoff alliance, I’d expect a first pick or captain to be pretty close to us in cycle time - maybe a little slower but not by much. Importantly, we didn’t think it would be safe to start assuming we could have 2 robots that could double speaker cycle on their own. So, let’s ballpark Partner 1 at 15 seconds on the speaker and 20 seconds on the amp.
Partner 2 Timing Assumptions
Partner 2 is a little trickier – going into this we had no expectation for what scoring would be most valuable in a 3rd robot. So, we evaluated 3 options:
Option 1: 3rd robot is Speaker only. They would wait for the amplification period, score a Note, and then reload and play defense. We assumed a 25 second minimum cycle time for this robot – so if cycling at 100% speed would be a 4-5 cycle per match team.
Option 2: 3rd robot is Amp only. This team would constantly be ferrying Notes into the Amp – which would mean some down time if they brought a note over during Amplification. We also assumed a 25 second cycle time for this option.
Option 3: 3rd robot can do both Speaker and Amp. They would primarily help optimize scoring during Amplification (similar to the speaker only bot) but they could help out with a timely Amp score if needed. We thought a team meeting this criteria may be a tick above the other options in scoring capability (and this was mainly to project closer to week 5 than week 3) so we gave this team a 20 second Speaker cycle and a 22 second Amp cycle.
In summary:
111 is assumed to have a 12 second Speaker, 18 second Amp
Partner 1/Captain is assumed to have a 15 second Speaker, 20 second Amp
Partner 2 can be 25 second Speaker, 25 second Amp, or 20/22 Speaker/Amp
So, what were the results? Timing charts and results summaries are in the drop downs below – note the number of red bars (amplification periods) in each case.
Amp Partner:
0 Amp Auto: 3 x 15 point Amp periods, -0 auto investment, 7 amp scores = 52 points.

2 Amp Auto: 4 x 15 point Amp periods, -6 auto investment, 6 amp scores = 60 points. We see that this setup achieves an extra amp period, and therefore outscores the 0 amp auto.

Speaker Partner:
0 Amp Auto: 3 x 20 point Amp periods, 0 point auto investment, 6 Amp scores = 66 points. Note: the 111 endgame time is 9 seconds here, likely not enough for a trap. Having partner 3 use some extra time to bring over a bonus Note for that might be helpful.

2 Amp Auto: 3 x 20 point Amp periods, -6 point auto investment, 4 Amp scores = 58 points. This setup does not get an extra Amp period despite the extra auto investment, and therefore gets fewer points than taking the speaker shots in auto.

Both Goal Partner:
0 Amp: 3x 20 point Amp periods, 0 point auto investment, 6 amp scores, 1 unboosted speaker = 68 points. This setup is interestingly similar to the 2 amp speaker only partner setup in when the final amp period ends (a bit after 110 seconds into tele), but without the auto investment.

2 Amp: 3x 20 point Amp periods + 1x 15 point Amp period, -6 point auto investment, 6 amp scores = 75 points.

Results summary:
0 Amp, Amp 3rd = 52 points, final amp period ends at 112 seconds (low risk)
2 Amp, Amp 3rd = 60 points, final amp period ends at 114 seconds (low risk)
0 Amp, Speaker 3rd = 66 points, final amp period ends at 126 seconds (high risk)
2 Amp, Speaker 3rd = 58 points, final amp period ends at 110 seconds (low risk)
0 Amp, Both Goal 3rd = 68 points, final amp period ends at 112 seconds (low risk)
2 Amp, Both Goal 3rd = 75 points, final amp period ends at 124 seconds (high risk)
So, in conclusion, what did we learn?
Amp periods are really powerful in this game – the best comparison is probably completing a set of gears in 2017 (but without the absurd 100 point playoff bonus). As far as the auto decision, there is no clear answer. You get payoff if you can complete an amp period you otherwise would not (seen in the amp and both goal conditions), but you risk a net loss if you do not get that extra amp (speaker partner). The other thing to consider with these examples is how much time you leave for endgame. It’s possible you miss an extra trap score in some of the “buzzer beater” examples, which would reduce the benefit to playing that strategy. Or, if defense slows down a robot in the critical path, it could delay your alliance to the point where you get one fewer amp period – a huge point loss.
At this point, it’s too hard to give a definite “run this auto when X, other auto when Y” conclusion. Need more time to understand our own robot capabilities, how much time we need for the endgame, and how much risk we’re ok taking on if planning for a late amp period.
I do expect that predicting the level of risk will be a major focus of our strategy and scouting efforts this year. We’ll need to become very good at projecting the performance of each partner at both scoring locations to start to develop a reasoning for what decision to make, and when. And develop a LOT of conditions (or develop a tool) to process partners with different capabilities than what we assumed for this post. Expect another strategy update when we figure that part out.
29 Likes
So looking at this , the margins are slim enough that IF the first or second bot were to be slowed down enough due to opportunistic defense then the conclusion becomes pure speaker play is more powerful.
There is no real way to hide you are scoring amplified cycles with the lights on the field, so you are at greater risk at those points to defense. Or in other words defense is more powerful during amp cycles.
The counter to this is to sync your amp cycles with the opponent, turning it into an all out scoring war because the opponent won’t want to waste their limited amplified time playing defense.
4 Likes
Hard to say? In the speaker partner cases, it seemed like it was getting risky to get that 3rd amp period if 0 amps in auto, vs feeling safe about it with the 2 amp.
It’ll be about minimizing risk, one way or the other. Just a matter of which path is less risky.
2 Likes
I love this game from a strategy and scouting perspective so much, hopefully reality meats the expectation.
3 Likes
We just missed ten hours of build time because of snow days, so we have some catching up to do. Today, we built and tested (for a little bit) a vertical compression shooter.
")


We had a few issues with the assembly (wrong number of spacers), and we only got one good shot with it before we had to close down for the night. Tomorrow, we’ll do consistency testing.
We want to use stealth wheels for the shooter, but those are out of stock. We’re using colsons right now because we had them in stock.
Details about the shooter:
-Compressing the note to 12" in width to get more consistent compression and more time with it compressed
-1/2" of compression
-4" Colsons belted 2:1 upduction on two NEO Vortexes
-That shot was at 75% power
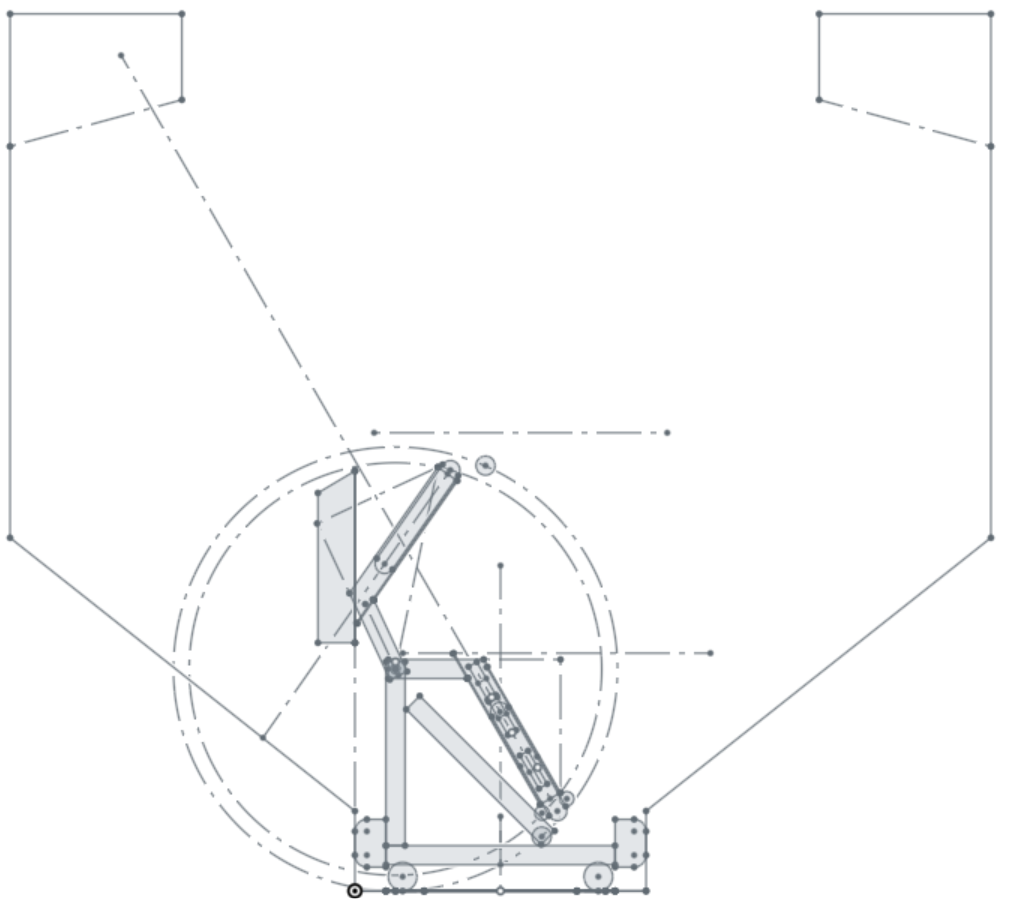
Shooter CAD:
On a side note, we fully built our trap today and were practicing throwing the note in with our hands. It’s surprising how easy it is. We got in about two out of twenty throws, but if we can do it by throwing it, a robot can do it by shooting it.

29 Likes
Do you have CAD for the shooter?
I just edited the post to include a CAD link.
1 Like
Any reason you want to use stealth wheels over colson? My team is in the same situation with only colsons in shop, and we’re not sure if the wait is worth it
Do you think this would be best compression in width? Is it possible to be smaller such as 9in which is shooter width for first update’s ri3d?
Stealth wheels are a lot lighter, and we want our shooter assembly to be light in order to more easily control it. Also, stealth wheels have better grip on the notes, which can allow us to accelerate them faster.
1 Like
We’re not sure what the best width compression is for top-bottom compression shooters. Increasing the compression side to side does give us more time gripping the game piece and better packaging, but we don’t want to have too much friction with the sides of the shooter.
You also might be confusing top-bottom compression shooters with side-side compression shooters. Cranberry alarm shot their notes by having shooter wheels on the side of the notes, while this shooter shoots with wheels on the top and bottom of the notes.
While this shooter does compress the note side to side, it doesn’t have wheels on the side propelling the note.
2 Likes
Very nice, almost the same as my team is doing and it works just as well. Also, is the width compression on purpose? If so, does it make a difference? Ours has no width compression (about 14.5 in of space in shooter).
1 Like